Problem/Question
How do I use mediasite to upload and organize my lecture videos?
Overview
Mediasite is an application in canvas used by faculty to view and organize all of their lecture videos for their classes.
Solution
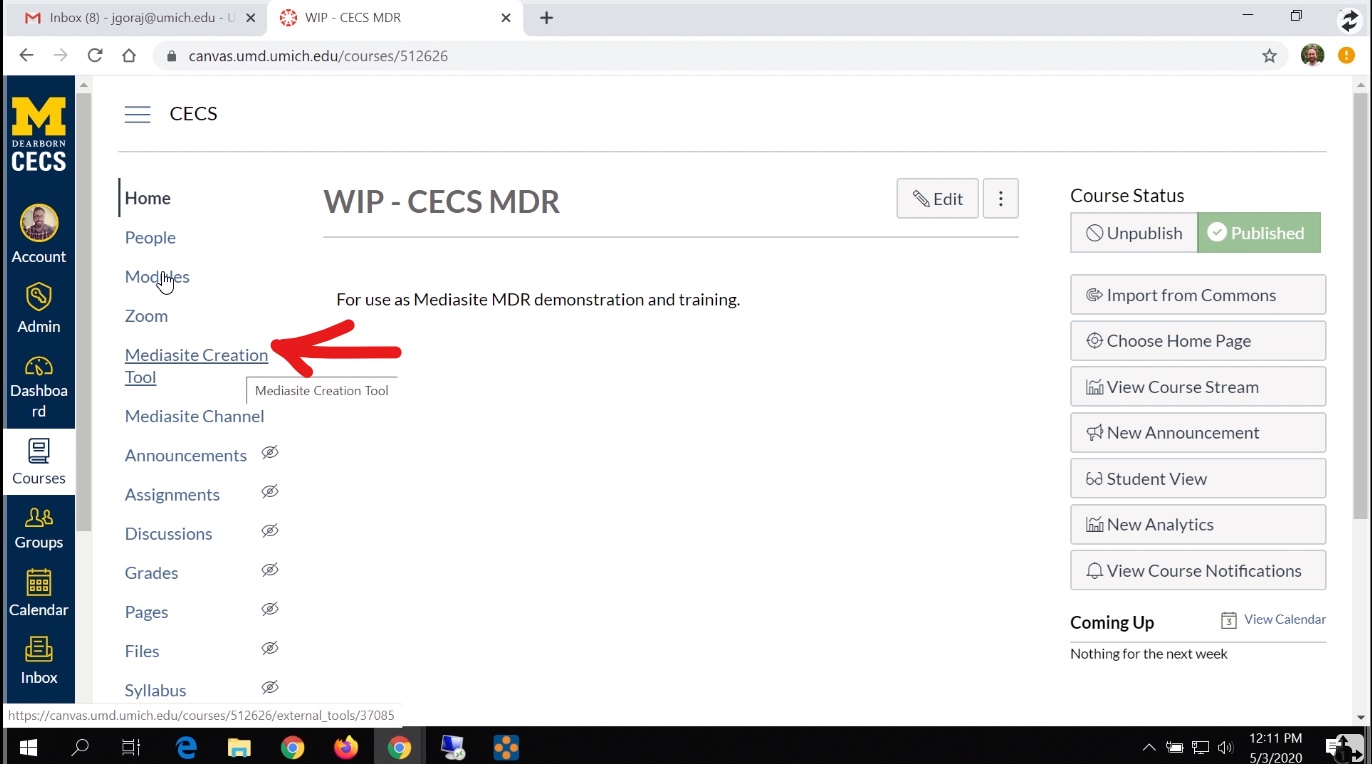
Faculty members with access to Mediasite should see a screen similar to this with Mediasite Creation Tool on the left side.
If this is the first time the faculty member is logging in to Mediasite Creation Tool, then they should get a screen asking them to give Mediasite Creation Tool authorization to your account.

After clicking Mediasite Creation Tool, the faculty member should see a screen that shows all of their lecture videos or lecture videos someone has shared with them.

Choosing who is able to view your videos
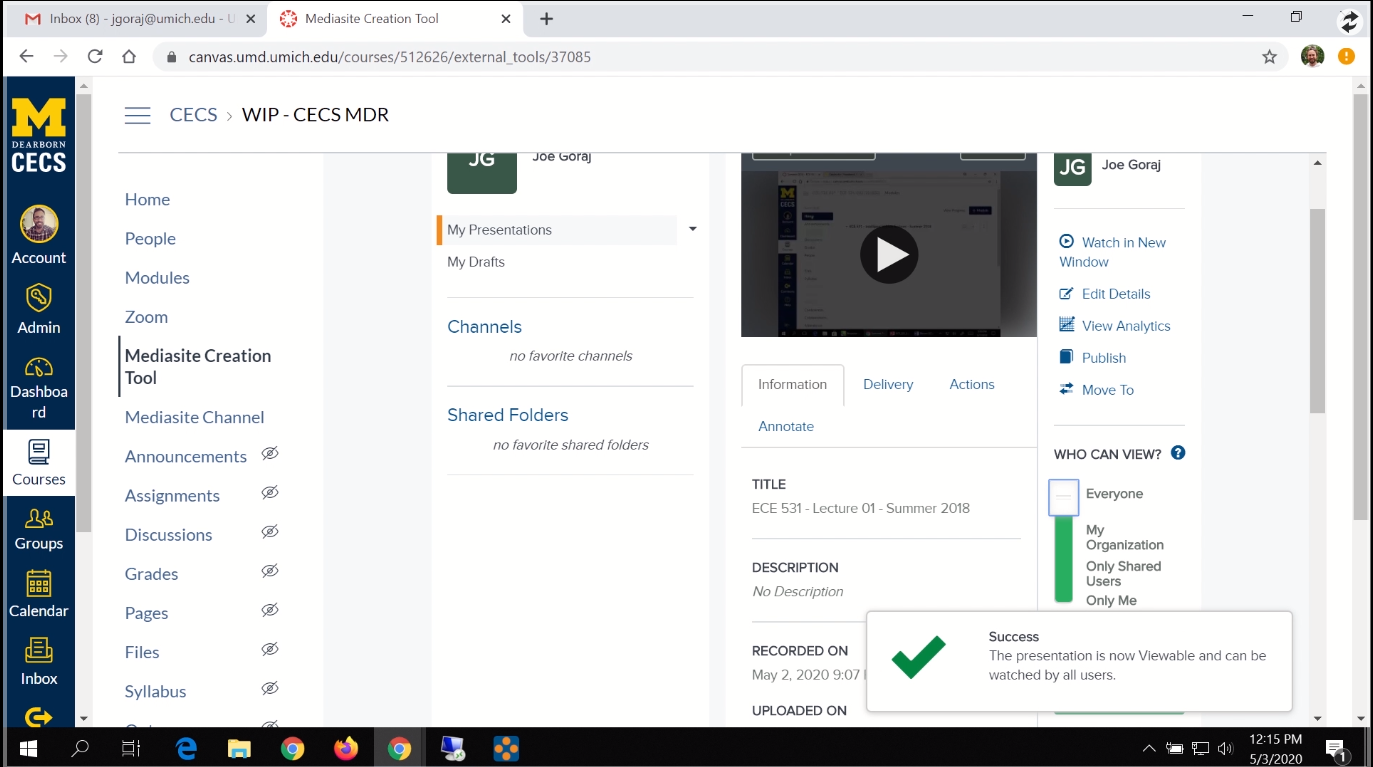
To choose who is allowed to view your lecture video, click on the video itself. It should lead you to a screen like the one below. In the bottom right corner, there is a slider you can move that determines who is able to view the video. Once the slider is moved, there should be a pop-up telling the user that the change on who is able to view the video is a success.
- Only Me - Only the faculty member who owns the video can see it.
- Only Shared Users - This gives access to the users in the course the video was made for.
- My Organization - This gives everyone who has access to this video, but is affiliated with the university access to the video.
- Everyone - Makes the video entirely public if they have the link to the video.
Making your Mediasite Channel for a course available to your students
- Navigate back to the home screen of the course (the first image), then click settings on the bottom left side

- Once inside, click on the navigation tab.

- Drag "Mediasite Channel" to the list at the top to make it visible to your students.
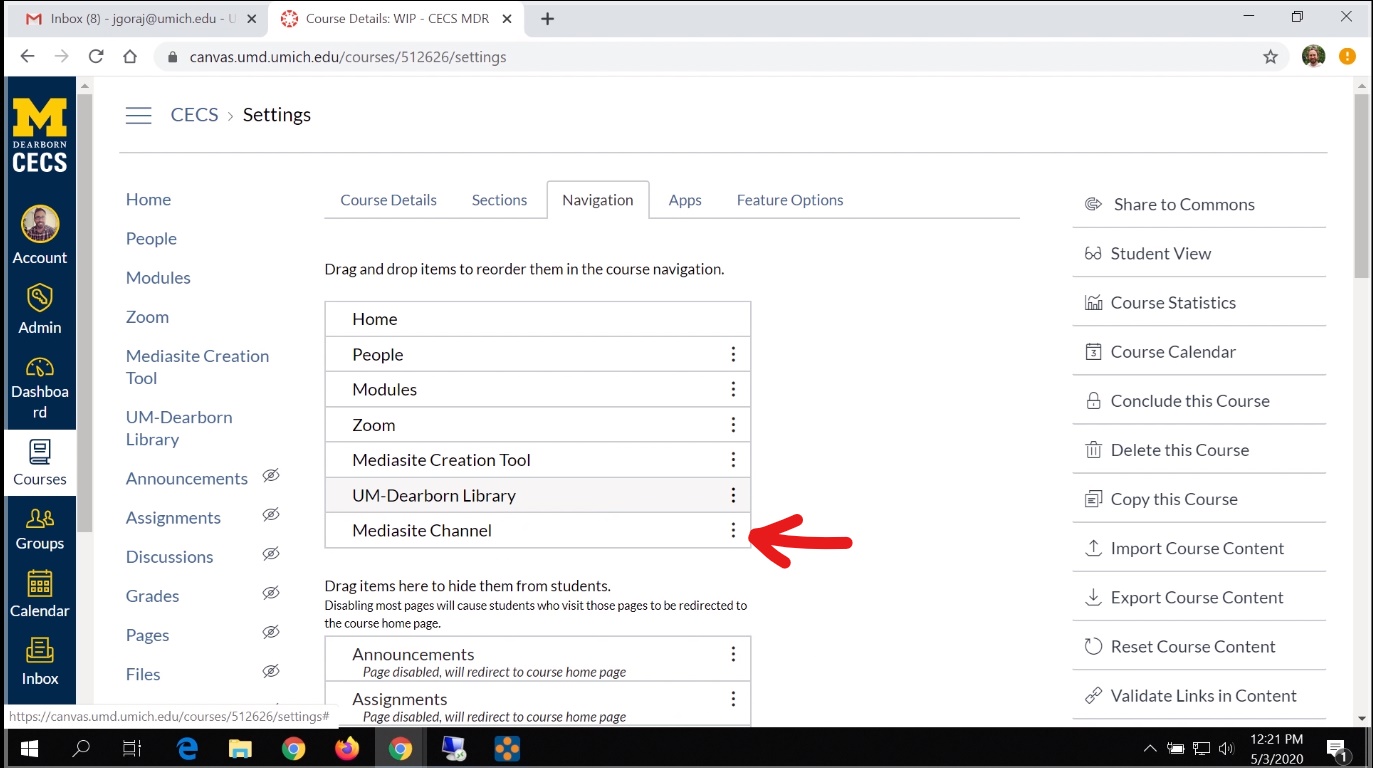
- Scroll down to the bottom of the page and click the save button.
- Now the Mediasite Channel tab should be in the navigation bar on the left side.
- This is what the students should see if they were to click on the Mediasite Channel tab.

- Once inside the channel, they should see a list of all of the available videos for the course, watch whatever video is available, and leave comments, if needed, that can be responded to by anyone in the class.
Mediasite video tags
Videos on Mediasite have tags associated with them. These videos are tagged with modules, not to be confused with Canvas modules. Tags identify the course the video is going in. Mediasite module names are created automatically the first time this Mediasite channel in your course is accessed. As admins, if you have lectures available to give to the faculty member, they will make the module for them. But, if the faculty member is creating their own videos using the Mediasite desktop recorder or are just creating videos they have on their own machine, they will have to create the module them self.
Creating Mediasite tags
To create your own Mediasite tag, you drag Mediasite Channel into the visible portion of the navigation bar, then you click on it and access it. The very first time it's access, it generates the module with the course title as the module title.
Note: If you remove the module from a presentation, it will also be removed from the Mediasite channel.
Add Media
There are 3 separate ways to add Media to your Mediasite Channel
- Recording a video using the Mediasite desktop recording software.
- Uploading an already existing recording on the Mediasite Desktop Recording software that just hasn't been uploaded yet.
- Uploading a file from your computer.
Using the desktop recorder
To use the desktop recorder, you have to download and install the software. You should a see the screen down below. Click on "download the Mediasite Desktop Recorder"

This software may be available in the software center and user's won't need admin access. But if it isn't there, then make a ticket for the user to get admin access to their computer and download the software that way.
Note: If you are running an Apple machine that runs the Mac OS Catalina, you need to download The Mediasite Capture application from the Mac App Store. Link to download: https://apps.apple.com/us/app/mediasite-capture/id1497744024?ls=1.
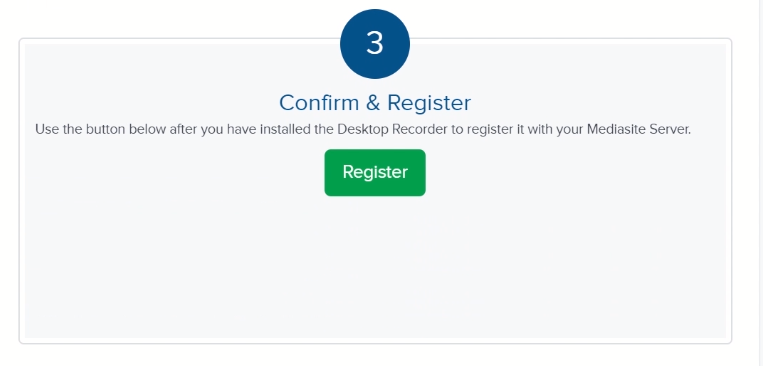
Once the software is downloaded on your machine, click "Confirm & Register" at the bottom of the screen and you should be able to start recording.
Recording software
When you start the recording software, this is the screen you should see below.

Adding media using the desktop recorder
- Once you have the desktop recording software setup and you want to add a lecture using it, you go back to your Mediasite channel and click "Add Media". Scroll to the bottom and click "Record Desktop".
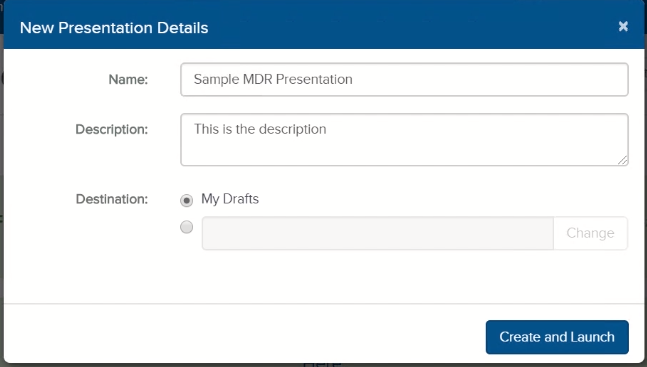
- Next, you fill out information about the presentation such as Name, Description, and destination of the presentation once it's finished.
- Press "Create and Launch" to start the recording.
- A pop-up should appear asking if you want to open mdr.exe. Click Open mdr.exe.
- A screen should appear with your presentation name and asking you to select the type of recording you want to perform.

- The next screen should show options on how you would like your camera size, camera input, and your microphone input prior to recording your lecture.

- The next screen asks you what part of your computer you would like to capture. Your options are between:
- Your desktop
- An entire window
- A region of your screen.
- It should show a final summary screen of your settings for the recording and what screen you are choosing to record before you actually start recording.
- To finish your screen recording you can go to the controller for the recording in the taskbar and click finish or you can pause your recording and click "Finish Recording".
How to create new modules
Click on the "Modules" section on the left hand side of the screen and click "Create a new Module".

Once your module is complete you can click the "+" button to add components to it.

In the example provided in the video, we are adding an assignment, quiz, and a video to this module.


To add a video to a module:
- Go to the Mediasite Creation Tool.
- Find the video you would like to add.
- Click share.
- Copy the link at the top of the screen.
- Change the viewing permissions to "Everyone".

- Return to "Modules".
- Have them add content, just like with the quiz and assignment from earlier.
- Add an external URL and paste the URL to your video there.

If you don't want to make your video public there are two ways around that. You can create a page or assignment to accomplish this.
Creating a page
Go to the pages tab on the left side, give your page a name, click the blue arrow drop down and click "Mediasite".

Once there, find the video you want to add, then choose how you want to add the video.

To add it to the a module, you return to "Modules" and add an element to the module. Add a page and select the page you would like to add.
Adding a video to a page

Add a video to a module using the assignments area
- Go to "Assignments" and create an Assignment group by clicking "+Group" and name your group.
- Then, add a video by clicking the blue dropdown menu and clicking "Mediasite".
- Search for your video and add it to the assignment.
- Create the assignment.
- Go to your module and add the assignment

For additional information, check these categories in the Knowledge Base:
Still Need assistance? See the following related services: